

Organizations receive different types of visitors—such as interview candidates, clients, vendors, auditors, and service personnel—who visit the office campus for specific purposes. These visits may be planned in advance through formal invitations or may occur as walk-ins. Each visit requires controlled access, accurate information capture, and proper monitoring to ensure security and a professional visitor experience.
Managing visitors manually can result in delays, incomplete records, and security risks. A structured visitor management process ensures that visitors are approved appropriately, guided through check-in and check-out, and tracked throughout their time on the premises.
Visitor Management in Apptimus is a digital system used to manage the complete lifecycle of visitors—from invitation and approval to check-in, check-out, and historical tracking—using web and mobile applications.
With Visitor Management in Apptimus, you can:
- Invite visitors in advance or manage walk-in visitors
- Configure visitor check-in rules, passes, and security requirements
- Control and approve devices or items carried by visitors
- Monitor visitors on premises in real time
- Maintain visit history for audits and compliance
Managing Visitors
Visitor management involves two broad aspects:
- Configuring visitor settings: This involves defining visitor policies, security controls, approval workflows, and data capture rules. These configurations are performed by facility administrators and determine how visitors are handled across the organization.
- Inviting visitors: This involves creating invitations, adding visitor details, responding to visit requests, and managing meetings. These actions are performed by employees who invite and host visitors using the mobile or web app.
Configuring Visitor Settings
Configuring visitor settings follows a logical flow that defines how visitors are handled from entry to exit.
- Configure Basic Settings: This helps define the overall visitor check-in experience and includes deciding how visitors authenticate themselves during check-in, the format of visitor passes, and whether additional acknowledgements such as consent forms or disclaimers are required before entry.
- Configure On-Premise Visitor Alerts: This helps admins keep a track of the visitors in the facility by configuring alerts to be sent to designated recipients when checked-in visitors remain on the premises beyond a defined duration, enabling timely action and ensuring visits do not extend longer than expected through multi-level alerting.
- Manage Visitor Items and Approvals: This helps ensure that the items brought by visitors into the facility are defined, and approval requirements are set for sensitive devices. It also allows admins to keep a track of the devices brought into the facility by visitors and ensure security and compliance standards are met.
- Configure Visitor Information Settings: This allows admins to define the information mandatory for visitors to submit when visiting the facility. It also involves defining the information that can be updated by visitors themselves.
- Configure Visit Purpose: This helps categorize visits such as meetings, interviews, audits, or service work, helping ensure consistency and clarity when visits are created and reported.
- Monitor Visitors: This involves tracking all the expected visitors for the day, checking them in, tracking checked in visitors, observing any visitor alerts triggered and taking appropriate action, and checking out visitors once the visit is complete.
Inviting Visitors
- Create the Invitation: Define the visit purpose and the expected date, time, and duration.
- If the visit is planned in advance, for example an Interview, create a regular invite using the web or mobile app.
- If visitors details are unknown, create an invitation for self-registration using the web or mobile app. This generates an invitation link that can be accessed by visitors for registering themselves to the event
- If you want to create an invite for a visit without adding detailed guest information, time, or other details of visit, use the Quick Invite option in the web or mobile app.
- Edit the Invitation: This can be done using the web or mobile app due to any changes in visitor details or visit timing, if required.
- Add Visitors: If the visitors were not added at the time of creating the invitation or if new visitors are to be added to the invite you can do so using the web or mobile app.
- Book a meeting room: Once the invite is sent out, book a meeting room for the event using the web or mobile app.
Sample Workflows for Visitor Management
There are three ways in which you can have visitors at your facility:
Invited Visitors
- Create an invitation
Based on the visit scenario, invitations can be created as:- Regular invitation for planned visits
- Quick invitation for urgent visits
- Visitor arrives at the facility
The visitor arrives at the facility on the scheduled date and time with a prior invitation. - Validate visitor entry
The security admin verifies the invitation and checks if approval is required for the devices that the visitor is carrying. Once all approvals are in place, the security admin issues an entry pass, and checks the visitor in. In case the items carried by the visitor are not approved, the visitor may still be allowed to check-in, but not carry the items with them. - Monitor all checked-in visitors
Once checked in, the visitor’s presence is monitored based on the expected visit duration and configured thresholds. On-premise alerts are triggered if the visitor remains on the premises longer than expected. - Complete the visit
When the visit is completed, the security admin checks the visitor out, and the visitor’s status is updated accordingly. - Record and retain visit history
All visitor activity, including invitation details, approvals, check-in and check-out times, and any overstays, is recorded and retained for monitoring, audits, compliance, and reporting purposes.
Note: Refer to the legend below the image for links to documentation for each of the processes.
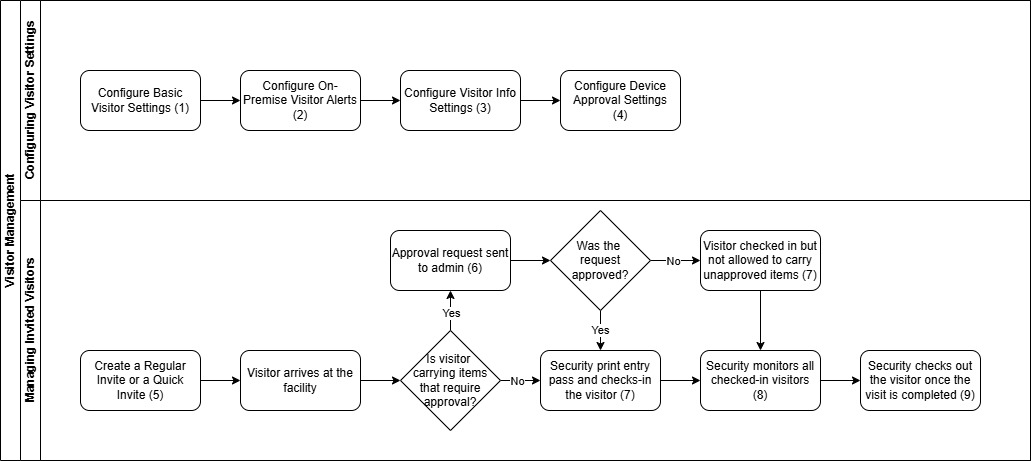
| Box No. | Doc Link |
|---|---|
| 1 | Configure Basic Visitor Settings |
| 2 | Configure On-Premise Visitor Alerts |
| 3 | Configure Visitor Info Settings |
| 4 | Configure Device Approval Settings |
| 5 | Create an Invite |
| 6 | Device Approvals |
| 7 | Check-in the Visitor |
| 8 | Manage Checked-in Visitors |
| 9 | Checking out Visitors |
Self-Registered Visitors
- Create an invitation for Self Registration
The visitor uses the URL provided in the meeting invite to add their details and register themselves for the visit. - Visitor arrives at the facility
The visitor arrives at the facility on the scheduled date and time. - Validate visitor entry
The security admin verifies the invitation and confirms approval of the items that the visitor is carrying, issues an entry pass, and checks the visitor in. In case the items carried by the visitor are not approved, the visitor may still be allowed to check-in, but not carry the items with them. - Monitor all checked-in visitors
The security admin verifies the invitation and checks if approval is required for the devices that the visitor is carrying. Once all approvals are in place, the security admin issues an entry pass, and checks the visitor in. In case the items carried by the visitor are not approved, the visitor may still be allowed to check-in, but not carry the items with them. - Complete the visit
When the visit is completed, the admin checks the visitor out, and the visitor’s status is updated accordingly. - Record and retain visit history
All visitor activity, including invitation details, approvals, check-in and check-out times, and any overstays, is recorded and retained for monitoring, audits, compliance, and reporting purposes.
Note: Refer to the legend below the image for links to documentation for each of the processes.
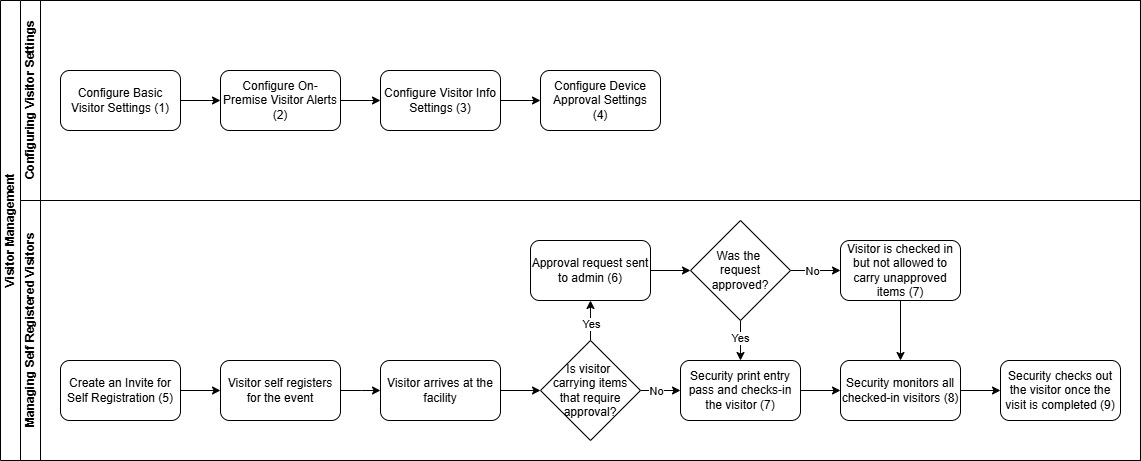
| Box No. | Doc Link |
|---|---|
| 1 | Configure Basic Visitor Settings |
| 2 | Configure On-Premise Visitor Alerts |
| 3 | Configure Visitor Info Settings |
| 4 | Configure Device Approval Settings |
| 5 | Create an Invite |
| 6 | Device Approvals |
| 7 | Check-in the Visitor |
| 8 | Manage Checked-in Visitors |
| 9 | Checking out Visitors |
Walk-in Visitors
- Visitor arrives at the facility
The visitor arrives at the facility without a prior invitation, as a walk-in visitor. - Visit request raised
A visit request is raised through the kiosk and routed to the host for approval or rejection before proceeding. - Validate visitor entry
Once the security admin receives confirmation of the visit approval and approval for the that the visitor is carrying, an entry pass is issued and the visitor is checked in. In case the items carried by the visitor are not approved, the visitor may still be allowed to check-in, but not carry the items with them. - Monitor all checked-in visitors
Once checked in, the visitor’s presence is monitored based on the expected visit duration and configured thresholds. On-premise alerts are triggered if the visitor remains on the premises longer than expected. - Complete the visit
When the visit is completed, the admin checks the visitor out, and the visitor’s status is updated accordingly. - Record and retain visit history
All visitor activity, including invitation details, approvals, check-in and check-out times, and any overstays, is recorded and retained for monitoring, audits, compliance, and reporting purposes.
Note: Refer to the legend below the image for links to documentation for each of the processes.
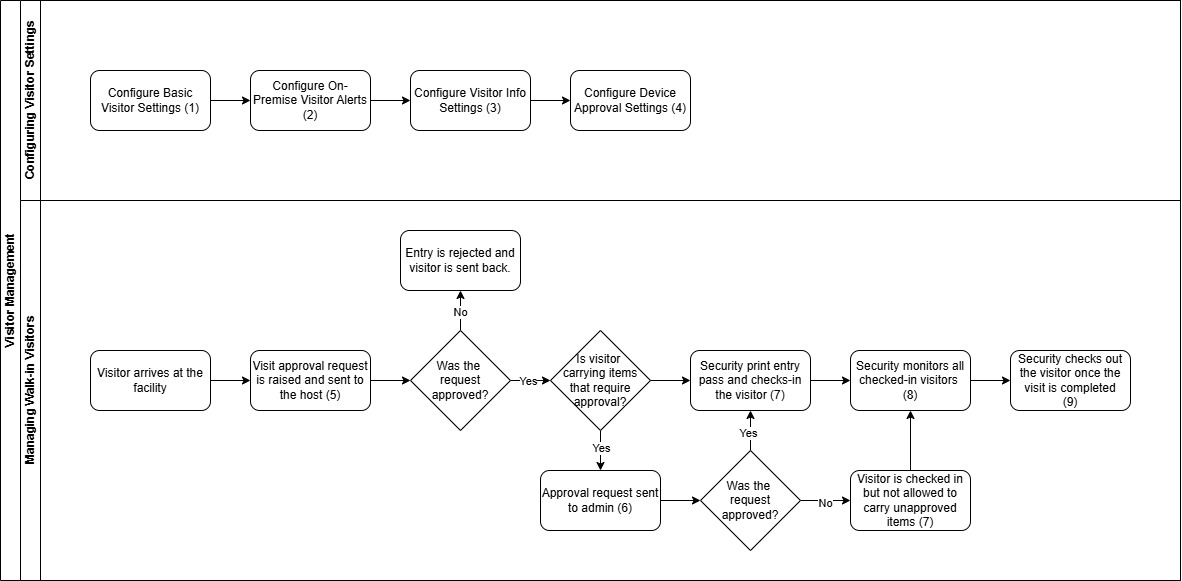
| Box No. | Doc Link |
|---|---|
| 1 | Configure Basic Visitor Settings |
| 2 | Configure On-Premise Visitor Alerts |
| 3 | Configure Visitor Info Settings |
| 4 | Configure Device Approval Settings |
| 5 | Manage Walk-in Visitor Request |
| 6 | Device Approvals |
| 7 | Check-in the Visitor |
| 8 | Manage Checked-in Visitors |
| 9 | Checking out Visitors |