
As an employee, you can:
- Update profile settings
- Change password
- Change MPIN
- Change campus
- Use identification code
- View app info
- View legal terms and conditions
- Logout of the application
You can easily update your profile settings through the app. This includes changing your password, selecting or updating your campus, modifying your MPIN, and using identification codes. These features ensure your profile remains secure and up-to-date.
Updating Profile Settings
You can update your profile settings, including your name, phone number, gender, designation, shift, and more. However, certain details are configured by the Admin during Employee Setup and cannot be edited by you.
To update profile settings:
- In the lower right corner of the Dashboard screen, tap Profile.
The Profile screen is displayed. - Tap on your/user name tab.
The Profile Settings screen is displayed. - Tap the
 icon to upload image profile picture.
- Enter or edit the following fields.
Field
Description
First Name
Displays your first name.
Last Name
Displays your last name.
Display Name
Displays your display name.
Phone Number
Displays your mobile number.
Gender
Displays your gender as configured by the Admin during Employee Setup.
Designation
Displays your designation as configured by the Admin during Employee Setup.
Work Mode
Select the applicable work mode, for example, In-office.
Location
Displays your campus location as configured by the Admin during Employee Setup.
Shift
Displays your shift timing as configured by the Admin during Employee Setup.
Category
Displays your user category as configured by the Admin during Employee Setup, for example, employee or vendor.
Employee ID
Displays your employee ID as configured by the Admin during Employee Setup.
Covid 19 Status
Displays your Covid 19 status, for example, Fully Vaccinated, as configured by the Admin during Employee Setup.
Share control for all meeting room
Enables the host to grant control access to participants for all meeting rooms. When this toggle is enabled, you do not need to share the control manually for each meeting; it is applied automatically for all meetings.
Note: In addition to these fields, the report may also display users’ configured team / group / department / business unit details as configured.
- Tap Save Changes.
A pop-up is displayed confirming that the profile settings have been updated. - Tap OK on the Success!! screen.
Changing Password
- In the lower right corner of the Dashboard screen, tap Profile.
The Profile screen is displayed. - Tap Change Password.
The Change Password screen is displayed.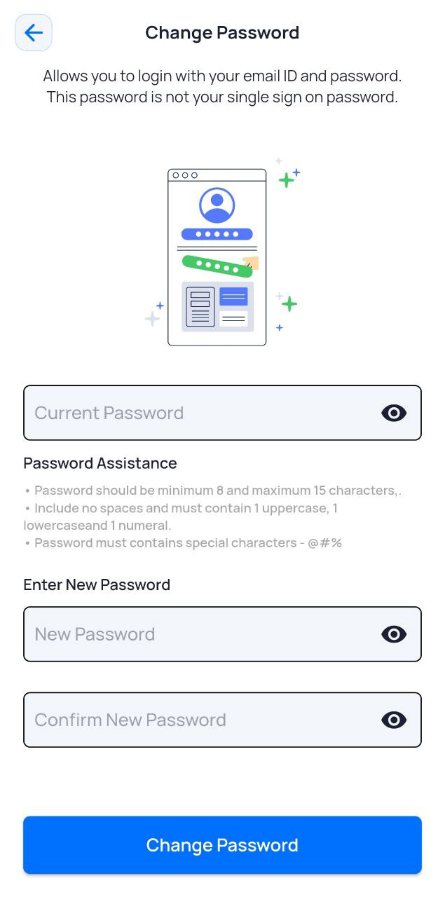
- Enter or edit the following fields.
Field
Description
Current Password
Enter the current password.
Enter New Password
- Enter the new password in the 1st field.
- Enter the new password in the 2nd field to confirm the password.
- Tap Change Password. A confirmation message is displayed indicating that the password has been successfully changed.
- Tap OK.
Changing MPIN
- In the lower right corner of the Dashboard screen, tap Profile.
The Profile screen is displayed. - Tap Change MPIN.
The Change MPIN screen is displayed.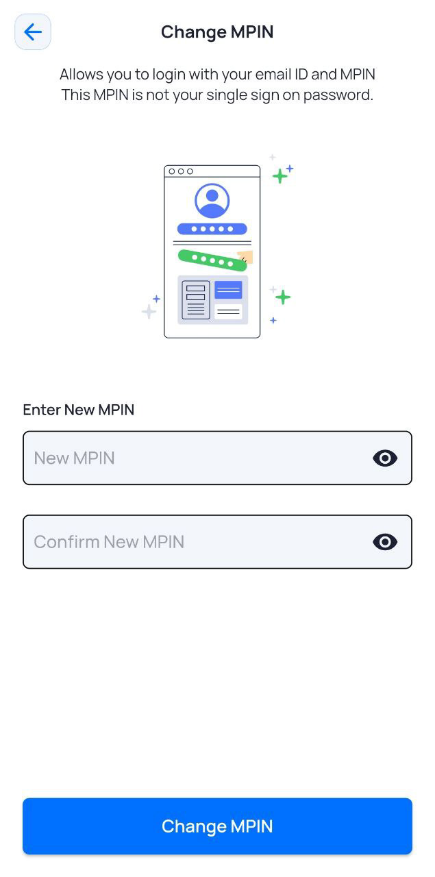
- Enter or edit the following fields.
Field
Description
Enter New MPIN
- Enter the new six-digit MPIN in the 1st field.
- Enter the new six-digit MPIN in the 2nd field to reconfirm the MPIN.
- Tap Change MPIN.
A confirmation message is displayed indicating that the MPIN has been successfully set. - Tap OK.
Change Campus
- In the lower right corner of the Dashboard screen, tap Profile.
The Profile screen is displayed. - Tap Change Campus.
The Change Campus screen is displayed.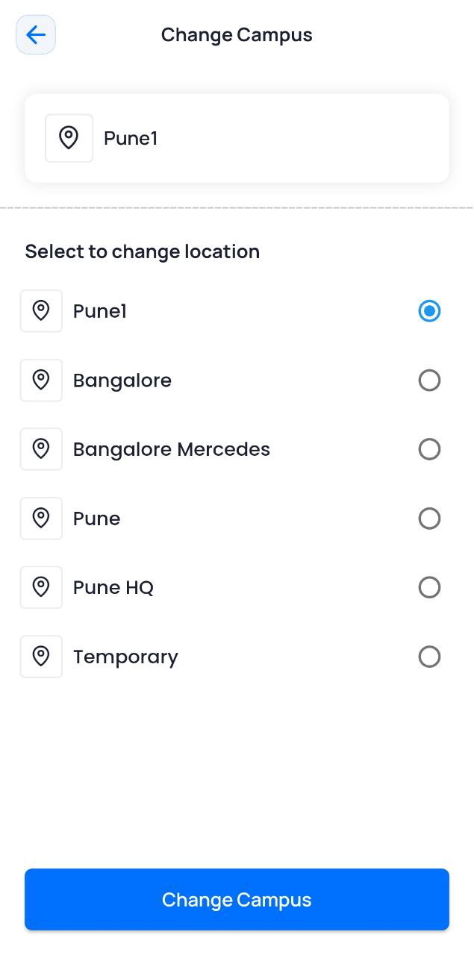
- From the list of available campuses, select a campus.
- Tap Change Campus.
A confirmation message is displayed. - Tap Yes.
Identification Code
Identification Codes or ID codes are similar to coupon codes and give you privileged access to avail special benefits or services within your office campus. For example, an ID code issued to you may allow you to receive a company T-shirt or avail free snacks at the cafeteria, and so on.
To see if any ID code(s) are issued to you:
- In the lower right corner of the Dashboard screen, tap Profile.
The Profile screen is displayed. - Tap Identification Code.
TheIdentification Code screen is displayed with active ID codes issued for you, if any.
Viewing Bluecoin and Apptimus App Info
Under your profile, you can view information about:
- Bluecoin IOT
- Contact Information
- App Version
- In the lower right corner of the Dashboard screen, tap Profile.
The Profile screen is displayed. - Tap About.
The About screen is displayed. - Tap on any of the sections to expand them and view the related information.
Understanding Legal Terms and Conditions
You can explore various terms, conditions, and policies related to your organization and Bluecoin. Typically, you may have access to policies such as the Bluecoin Privacy Policy, your organization's Privacy Policy, Terms and Conditions, Intellectual Property, End-to-End Process Flow, Disclaimer, and Refund and Cancellation Policy. The availability of these documents depends on the settings configured by your organization’s admin.
- In the lower right corner of the Dashboard screen, tap Profile.
The Profile screen is displayed. - Tap Legal Terms and Conditions.
The Terms and Conditions screen is displayed. - Tap on any of the policy links to be redirected to the respective policy web page.
Logging out of the Application
- In the lower right corner of the Dashboard screen, tap Profile.
The Profile screen is displayed. - Tap Logout.
The Logout pop-up window is displayed. - Tap Yes.