
In this section, you will learn how to:
Creating a Service Request
There are multiple ways to create a service request from the Apptimus app.
- Scanning the QR code: Some spaces in your campus may have a QR code placed nearby for raising a service request. For example, a QR code for microwave cleanup might be posted near the microwave in the pantry. By scanning the QR code, you can quickly raise a service request without entering the basic details.
- Using the Shortcuts: Common services have shortcuts available in the Service Requests module. Users can easily select any of these shortcuts to quickly raise a service request without entering basic details.
- Entering the details manually: In case a QR code is unavailable or your service request is not listed in the shortcuts, you can also manually enter the details of the service request.
Note: The Shortcut options will be displayed only if they have been configured by the admin.
To create a service request:
- On the Dashboard screen, tap Service Request.
The Service Request pop-up displays two options.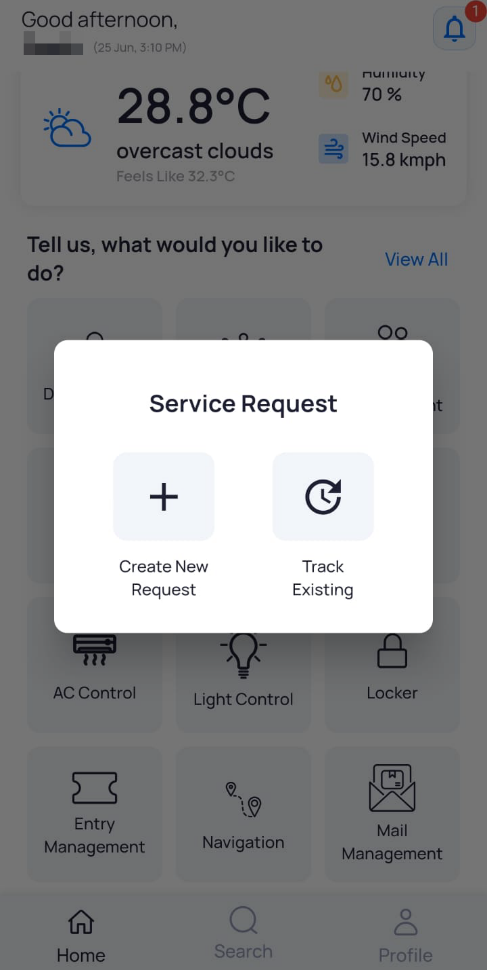
- Tap Create New Request.
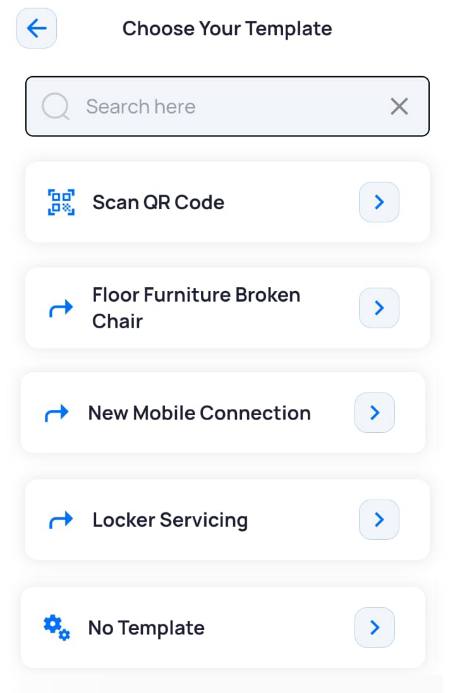
The Choose your Template screen is displayed. - Tap any of the following options:
Creating Service Requests by Scanning the QR Code
- On the Choose Your Template screen, tap Scan QR Code.
The New Service Request screen opens, displaying fields for entering basic information and prompting the user to allow the Apptimus app to scan a QR code. Once the QR code is scanned, the fields are automatically populated.Note: In some cases, the Attachment field may be configured as a mandatory field. If so, you will need to upload a file before submitting the request.
- Tap Submit.
The service request is created and displayed on the Service Request screen under the Open tab. A push notification is also sent to the user who created the service request and to the user who has been assigned the service request.
Creating Service Requests using Preconfigured Shortcuts
When creating a service request using a shortcut, note that the options available to you depend on how the shortcut has been configured by the admin.
- Mandatory fields: In some cases, the attachment field may be mandatory. If so, you will need to upload a file before submitting the request.
- Limited options: The shortcut may restrict the options you see. For example, if you are raising a service request for a meeting room using a shortcut, you might only see a limited list of meeting rooms—such as those on a specific floor—instead of the complete list of rooms in the facility. This is because the shortcut has been predefined by the admin to include only certain meeting rooms.
- On the Choose Your Template screen, tap the required service request shortcut.
The New Service Request screen is displayed. - Enter or select the required field information.
The field displayed on this screen will vary depending on the shortcut selected. - Tap Submit.
The service request is created and displayed on the Service Request screen under the Open tab. A push notification is also sent to the user who created the service request and to the user who has been assigned the service request.
Creating Service Requests Without a Template
- On the Choose Your Template screen, tap No Template.
The New Service Request screen is displayed. - Enter or select the required field information.
Field
Description
Service Related to
Select the location for which you are raising the service request.
Note: This field will be auto populated if you select the Scan QR Code or Shortcut option.
Service
Select the type of service from the options available in the dropdown. You can also click on the
 icon for additional details about the selected service.
Note: This field will be auto populated if you selected the Scan QR Code or Shortcut option.
Sub Service
Select the type of sub-service from the options available in the dropdown.
Note: This field may be hidden if so configured by the admin. If displayed, the options available here will vary based on the type of service selected. This field will be auto populated if you selected the Scan QR Code or Shortcut option.
Tap Edit to fill out the form for raising this service request.
Note: This field will be displayed only if a form has been created for this service request.
Select the priority of the service request as Low, Medium, or High.
Note: This field will be auto populated if you selected the Scan QR Code or Shortcut option.
Title
The title is auto populated based on the selected location and type of service and sub service. You can edit the title, if required.
Description
Add a description of your service request.
Attach supporting documents with your service request. For example, an image of an unclean desk, a screenshot of an error on your computer, or a PDF document.
Note: The attachment must not exceed 10 MB in size and is restricted to .png, .jpeg, .jpg, .pdf, and .xlsx formats.
Note: In case of an error while attaching documents, an appropriate Error Message is displayed on the screen.
Note: This field is displayed only if it has been configured by the admin.
- Tap Submit.
The service request is created and displayed on the Service Request screen under the Open tab. A push notification is also sent to the user who created the service request and to the user who has been assigned the service request.
Editing a Service Request
- On the Dashboard screen, tap Service Request.
- On the Service Request pop-up, tap Track Existing.
The Service Request screen with the Open tab listing the active service requests (if any) is displayed.
The Service Request screen with the Open tab listing the active service requests (if any) is displayed. The Closed tab displays all service requests marked with a Closed status. The Assigned tab displays all service requests assigned to the logged in user.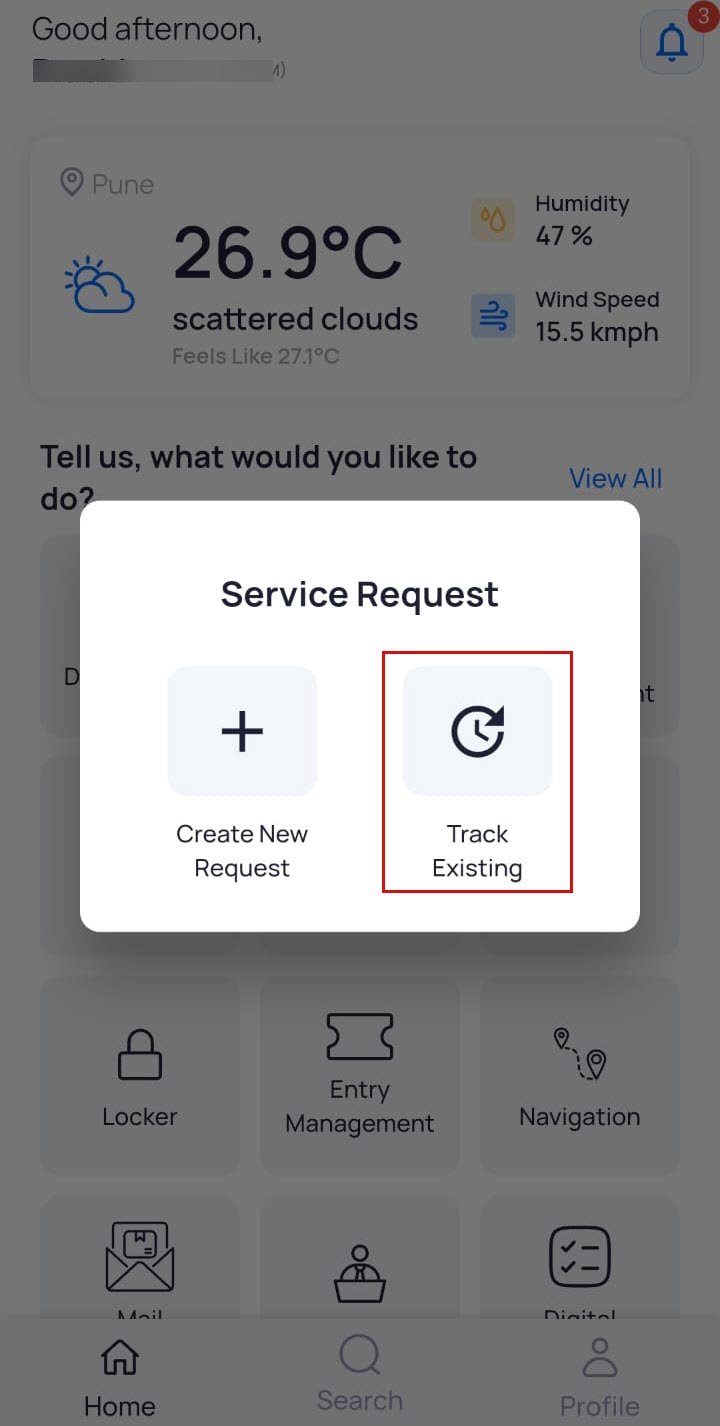
- Select the tab under which you want to edit the service request.
- Tap the service request you want to edit.
- Under Edit Request, edit the required fields.
Field
Description Title
Edit the title of the service request, if required.
Note: The title is automatically populated based on the information entered at the time of raising the service request.
Description
Edit the description of the service request.
Service Related To
Displays the resource to which this service is related. For example, campus, building, or floor.
Note: This is a read-only field and cannot be edited.
Location Displays the name of the campus.
Note: This is a read-only field and cannot be edited.
Service Displays the type of service requested. Click
 for details about the service type.
Note: This is a read-only field and cannot be edited.
Sub Service Displays the type of sub service requested. Click
for details about the sub service type.Note: This is a read-only field and cannot be edited.
Additional Details Displays the form filled out at the time of creating a service request, if any. Click View to view the form.
Note: This is a read-only field and cannot be edited.
Priority Edit the priority of the service request.
Note: This field is displayed only for selected service/sub service type as configured by the admin.
Assigned To Displays the name of the default user to whom the service request is assigned. Based on your role, you may be able to assign the service request to another user.
Acting Owner or Approver Select the user who will approve the service request.
Note: This field is only displayed when the approval type is configured as Dynamic by the admin. Only
Created By Displays the name of the user who raised the service request. Click on the
 icon to view details about the user.
Note: This is a read-only field and cannot be edited.
Created At Displays the date and time at which the service request was created.
Note: This is a read-only field and cannot be edited.
Updated At Displays the date and time at which the service request was updated.
Note: This is a read-only field and cannot be edited.
Acknowledge At Displays the date and time at which the service request was acknowledged.
Note: This is a read-only field and cannot be edited.
Status Displays the status of the service request. You can change the status as required. For more information on the statuses, click here.
- Tap Update.
The user who created the service request receives a push notification for the updated service request.
Understanding the Statuses at the time of Editing a Service Request
Note: The statuses available to a user depend on their assigned roles and permissions.
|
Field |
Description |
|---|---|
|
Queued |
Assigned automatically when a service request is raised. |
| In Progress |
Assigned when the assignee has taken up the service request and has started processing it. |
| More Inputs Required |
Assigned when more inputs are required from the user who created the service request. |
|
Cancelled |
Assigned when the user who created it no longer wishes to keep the service request active. |
| Closed |
Assigned when the service request has been closed. Note: A closed service request does not necessarily mean that it has been resolved. Once a service request is closed, it cannot be reopened. |
| Approval Pending |
Assigned when the service request needs to be approved (by user as per the configured settings) |
| Rejected |
Assigned when the service request is rejected. For exmaple, in case of Dynamic approvals for Lost and Found service types, this status can be selected by the user to deny the found object as theirs. |
| Approved |
Assigned when the service request is approved. For example, in case of Dynamic approvals for Lost and Found service types, this status can be selected by the user to confirm the found object as theirs. |
|
Reopened |
Assigned when the user who created the service request wants to reopen a resolved service request due to new information or incorrect resolution. |
|
Resolved |
Assigned when the service request has been resolved. Note: A resolved service request can be reopened by the user who created it. |