

To book a meeting room you can:
- Use the quick booking feature
- Book a meeting room with custom selections
- Configure dynamic variables for meeting invites
Quick Booking for an Immediate Meeting
To book a room for a meeting that will start immediately, you can use the Quick Search option to search for and select a meeting room. This feature is ideal for an impromptu or last-minute meeting.
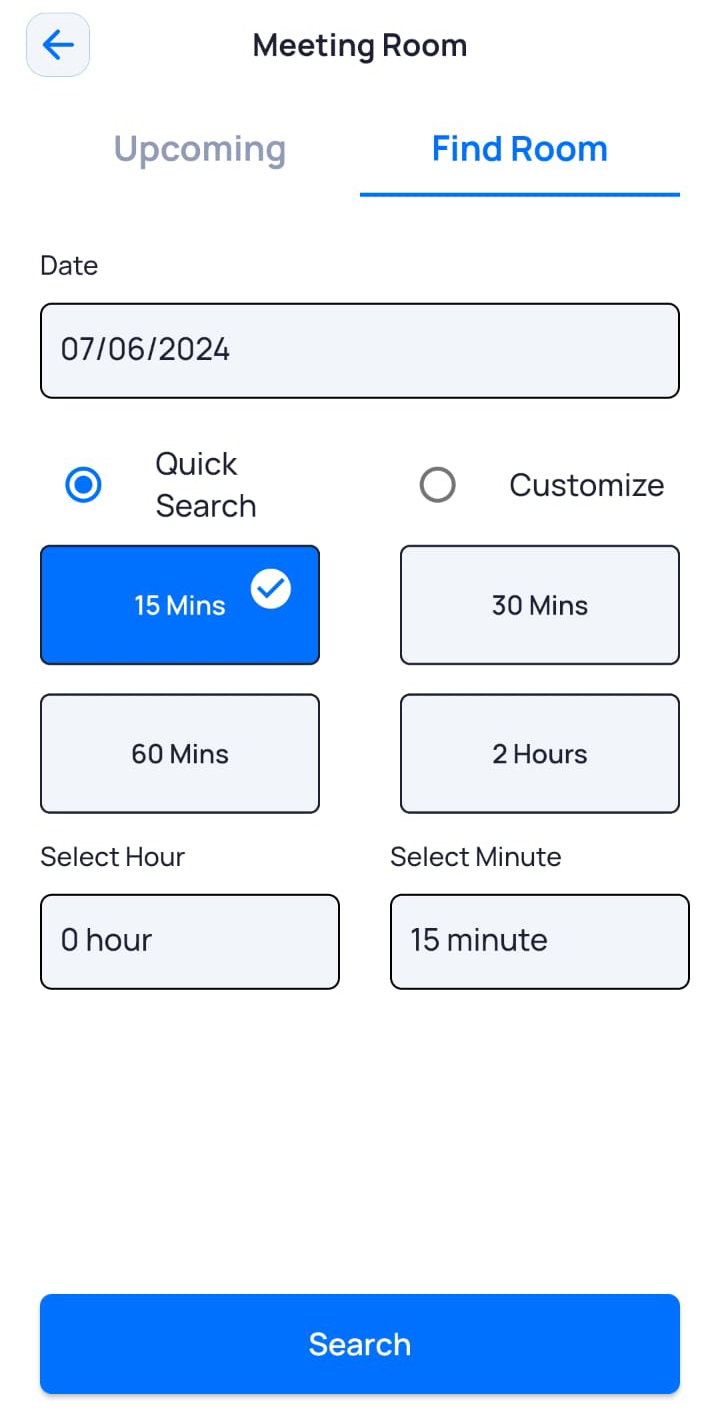
However, with Quick Search:
- You cannot specify the start time of the meeting. The current time is taken as the default start time.
- You cannot specify amenities that you need in the meeting room.
To book a meeting room immediately with Quick Search:
- On the Dashboard screen, tap Meeting Room.
The Meeting Room screen is displayed with the Upcoming tab open, by default. - Tap Find Room.
- Against Date, select the date for which you want to book the meeting room and tap OK.
- Tap Quick Search.
Note: The Quick Search radio button may be selected by default.
- Tap the duration for which you want to book the meeting room from the available shortcuts.
Or
Specify a custom duration using the Select Hour and Select Minute options. - Tap Search.
- From the of Available Meeting Rooms displayed, tap Book against the room you want to select. You can also search for a specific room by typing the name in the search bar.
- Enter or select the requied field information.
Field
Description
Title*
Enter a title or agenda for the meeting.
Teams Meeting
Select Yes if a link for a Microsoft Teams meeting is to be included for remote participants.
Note: This field name will change according to the online meeting platform that Bluecoin has integrated with. For example, if the integration is with WebEx, the field will be WebEx Meeting.
Invite Participants
Search for user(s) to be invited to the meeting and click on their name to select them. You can add multiple invitees to the meeting here.
Message
Enter any additional message about the meeting, if required.
Justification*
Enter the reason for booking the meeting room.
Note: This field is displayed only for meeting room bookings that require approval.
Note: This field may be mandatory or optional depending on the settings configured by the admin.
- Tap Confirm Booking.
A confirmation message is displayed.Note: In case an approval is required for room booking the following message is displayed - “Your request has been submitted for approval.
- Tap OK.
All participants receive an email with the meeting room booking details as well as a push notification on the Apptimus app.Note: The details of this meeting are available on the dashboard under Today’s Activities (if the meeting is scheduled for the current date) and in the Meeting Room module under the Upcoming tab.
The meeting organizer gets the Meeting Room Check-in Reminder.Note: If the meeting organizer does not check-in within the time configured in the meeting room profile, the meeting room will be cancelled automatically and will be released for use by others. For example, if the meeting is scheduled at 11:30 AM, and the default time for check-in is 5 minutes after the meeting start time, the organizer must check-in by 11:35 AM to prevent auto-cancellation.
Note: Once a meeting is cancelled, it will no longer be displayed on the home page or in the Meeting Room module.
Booking a Meeting Room with Custom Selections
- On the Dashboard screen, tap Meeting Room.
The Meeting Room screen is displayed with the Upcoming tab open, by default. - Tap Find Room.
- Against Date, select the date for which you want to book the meeting room and tap OK.
- Tap Customize.
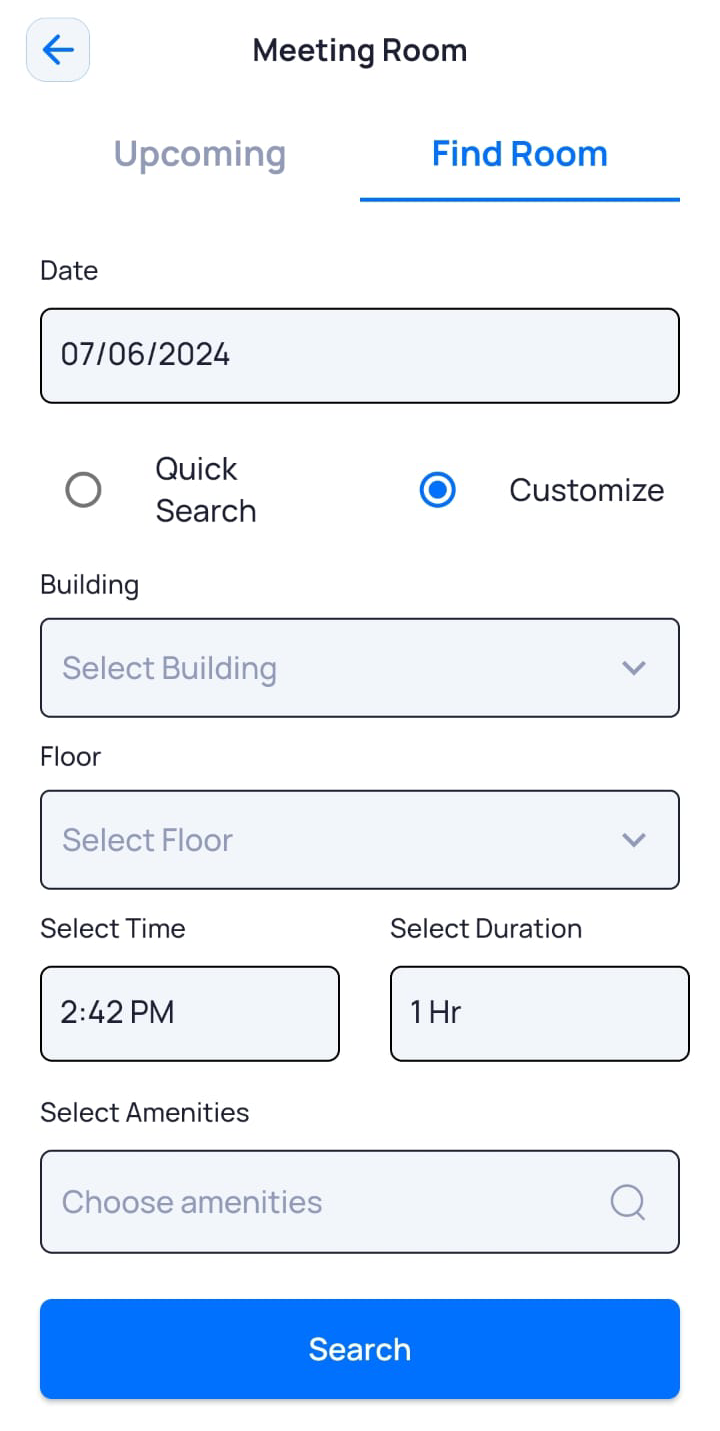
- Select the Building and Floor on which you want to find a meeting room.
- Select the start time and duration for the meeting.
- To select amenities that the meeting room should have:
- Tap Select Amenities.
- Tap the amenities you need to select them.
- Tap Done.
- Use Add People to specify the number of people who will attend the meeting in-person.
- Tap Search.
- From the list displayed, tap Book against the room you want to select.
- Enter or select the required field information.
Field
Description
Title*
Enter a title or agenda for the meeting.
Teams Meeting
Select Yes if a link for a Microsoft Teams meeting is to be included for remote participants.
Note: This field name will change according to the online meeting platform that Bluecoin has integrated with. For example, if the integration is with WebEx, the field will be WebEx Meeting.
Invite Participants
Search for user(s) to be invited to the meeting and click on their name to select them. You can add multiple invitees to the meeting here.
Message
Enter any additional message about the meeting, if required.
Justification*
Enter the reason for booking the meeting room.
Note: This field is displayed only for meeting room bookings that require approval.
Note: This field may be mandatory or optional depending on the settings configured by the admin.
- Tap Confirm Booking.
A confirmation message is displayed.Note: In case manager approval is enabled for booking the meeting room, the following message is displayed - “Your request has been submitted for approval.”
- Tap OK.
All participants receive an email with the meeting room booking details as well as a push notification on the Apptimus app.Note: The details of this meeting are available on the dashboard under Today’s Activities (if the meeting is scheduled for the current date) and in the Meeting Room module under the Upcoming tab.
The meeting organizer gets the Meeting Room Check-in Reminder.Note: If the meeting organizer does not check-in within the time configured in the meeting room profile, the meeting room will be cancelled automatically and will be released for use by others. For example, if the meeting is scheduled at 11:30 AM, and the default time for check-in is 5 minutes after the meeting start time, the organizer must check-in by 11:35 AM to prevent auto-cancellation.
Note: Once a meeting is cancelled, it will no longer be displayed on the home page or in the Meeting Room module.
Configuring Dynamic Variables for Meeting Invites
When booking a meeting room, you can configure system-level settings that define the messages displayed in the body of the invite sent to participants. These messages can include both static and dynamic variables that automatically display relevant information into the invite. The purpose of adding such variables is to include additional, context-specific details in the email.
For example, adding the variable @@@ORGANIZER@@@ in the system settings ensures that every meeting invite automatically displays the meeting organizer’s name in the email body.