
In this section, you will learn how to:
The Biometric Face Profile feature allows users to sign in to the app using a face recognition system. This functionality captures and stores the user's facial features, enabling secure and convenient authentication without the need for passwords or MPINs.
Photo Guidelines
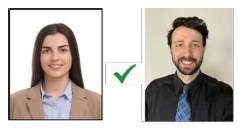
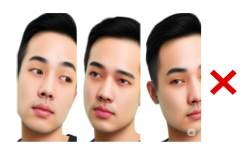
Before you capture or upload the photo, ensure that you have met the following guidelines:
Note: The system will display an error message if the following guidelines are not met.
DOs
|
|
|
|
|
|
|
|
|
|
|
|



Don'ts
|
|
|
|
|
|
|
|
|
|
|
|


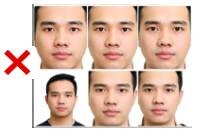
Adding a Biometric Face Profile
- In the Main menu, under the ADMIN OPTIONS, in the Employee Setup subsection, click Users.
The Users tab with a list of existing users, if any, is displayed. - Under the Action column, click the
 icon for the user for whom you want to add biometric details.
The user information is displayed. - Scroll to the bottom of the page and click Biometric Face Profile.
The Biometric Face Profile pop-up is displayed. - To upload a passport size photo, click the
 icon.
OR
To click and upload a photo, click Use Camera. - Click Sync Profile.
The biometric details are synced with the user profile.
Validating Face Profiles
This feature scans the biometric face profiles of all users in the system and identifies any anomalies—such as poor image quality or cases where the system is unable to recognize the user from the stored photo. It uses advanced algorithms to check whether each image meets the required standards and then generates a report highlighting any issues that need attention.
- In the Main menu, under the ADMIN OPTIONS, in the Employee Setup subsection, click Users.
The Users tab with a list of existing users, if any, is displayed. - To initiate the download, click Schedule Upload/Download and then select Validate Face Profile.
A pop-up message with the request ID for the download is generated. - Click OK.
- To access the report, click Schedule Upload/Download again and then select Users Schedule Report from the drop-down menu.
The Users Scheduled Job tab with a list of request IDs is displayed in a separate browser tab. - Click Refresh if your request ID is not listed.
- Under the Action column for your request ID, click Download.
The user’ report is downloaded and provides the following information:Field Description Email Displays the user’s email address.
Username Displays the user’s username.
Authtype
Displays the type of authentication method used by the user for signing into the app.
Manually Managed
Displays whether the user’s metadata not synced with the HRMS system is managed manually or not.
First Name Displays the user’s first name.
Last Name Displays the user’s last name.
Display Name Displays the user’s display name.
Employee Code Displays the user’s employee code.
Active Displays whether the user is activated in the system or not. The values displayed are:
- 1: The user is active
- 0: The user is not active
Default Location Displays the user’s default location.
Status Displays the status of the user’s face validation check as:
- No issue: If no issue was detected with the user’s photo
- NA: If user’s photo is not available
- Description of the issue
Resetting Face Profiles
Biometric face profiles are generated using a caching mechanism to ensure quick and accurate face recognition. If the cache becomes outdated or incorrect, you can reset the face profiles. This process helps maintain the accuracy and efficiency of the face recognition system.
To reset face profiles:
- In the Main menu, under the ADMIN OPTIONS, in the Employee Setup subsection, click Users.
The Users tab with a list of existing users, if any, is displayed. - Click the
 icon.
The profiles are reset.